 ✕
✕
By Justin SabrinaUpdated on January 30, 2024
There are many situations where you need to take a screenshot on Mac or Windows, from saving data, organizing information, or communicating with others. The Print Screen (PrtScn) key allows you to capture your entire screen on a Windows computer. But what if the Print Screen doesn't work, or your computer doesn't have the Print Screen button? Don't worry, Windows offers several alternative methods to screenshot without a print screen. In this comprehensive guide, we'll explore alternative techniques, shortcuts, and tools that empower users to take screenshots on Windows without the Print Screen. Whether you are having the older Windows XP, or the newest Windows 11, you can follow this guide to take Snapshots on your Windows without a print screen key. Let's get started!

CONTENTS
You can use alternative screenshot keys to take a screenshot without the print screen button. We've listed some laptop models here. Take a look:
1) Screenshot On HP Laptop Without Print Screen:
Step 1. Press Fn + Windows Key+ space bar simultaneously to capture everything on your screen
Step 2. Then open Paint and press the Ctrl + V to paste it there.
Step 3. You can edit it, and save the final output on your device as easily.
2) Screenshot on Lenovo Chromebook Without Print Screen:
Press "Ctrl + Window Switcher" keys simultaneously to take a screenshot of the entire screen.
Or, press "Ctrl + Shift" keys simultaneously, then press "Window Switcher" key to take a screenshot of an active window.
3) Screenshots on Asus Laptop Without Print Screen
Step 1. download and install third-party keyboard remapping software on your Windows, then launch it.
Step 2. In SharpKeys, click on "Add" to create a new key assignment. In AutoHotKey, you'll need to create a script.
Step 3. Select the original key from the list, assign the new key to function as Print Screen, click "OK"
Step 4. Open an app or window, and press the newly assigned key to test if it captures a screenshot.
To screenshots without a print screen, you can use the built-in Snipping tool on Windows Vista and later. It has a user-friendly interface and the ability to capture custom screenshots.
Step 1. Go to the Start menu and search for "Snipping Tool."

Step 2. Click "New" button or click "Mode" to select the desired snipping mode: Free-form, Rectangular, Window, or Full-screen.

Step 3. Capture the area accordingly and annotate it or save the screenshot to your desired folder.
The Snip & Sketch tool has replaced the Snipping tool on Windows 10 and Windows 11. It makes it easier to access, annotate and share screenshots than the old Snipping Tool. If you are using Windows 10 or 11, you can use it to screenshot on Windows without a print screen.
Step 1. Press "Windows key + Shift + S" to open Snip & Sketch.

Step 2. Choose the snipping mode.

Step 3. Capture the desired area, and the screenshot will be saved to the clipboard.
To take a screenshot on Windows without print screen, you can also use a third-party screenshot app. There are many awesome screenshot tools for Windows and Mac, among them, we highly recommend the UkeySoft Screen Recorder.
UkeySoft Screen Recorder is a all-round screenshot tool, screen recorder, video recorder, audio recorder, as well as video editor. This powerful tool enables you to take screenshots of the entire screen, specific window, any app or website, and the screenshots will be saved in various format, such as HPG, PNG or BMP. You can use the shortcut key to take Snapshots on Windows and Mac quickly and easily. After capturing a Snapshot, you can use its built-in annotation tool for annotating or editing, like adding texts, shapes, arrows, drawings, etc.
○ Take a screenshot on Windows: Press F8.
○ Take a screenshot on Mac: Press Command (⌘) + 4.
Higlight Features:
Step 1. Install and Run UkeySoft Screen Recorder
Click the Download button, get the UkeySoft Screen Recorder downloaded on your Windows PC.
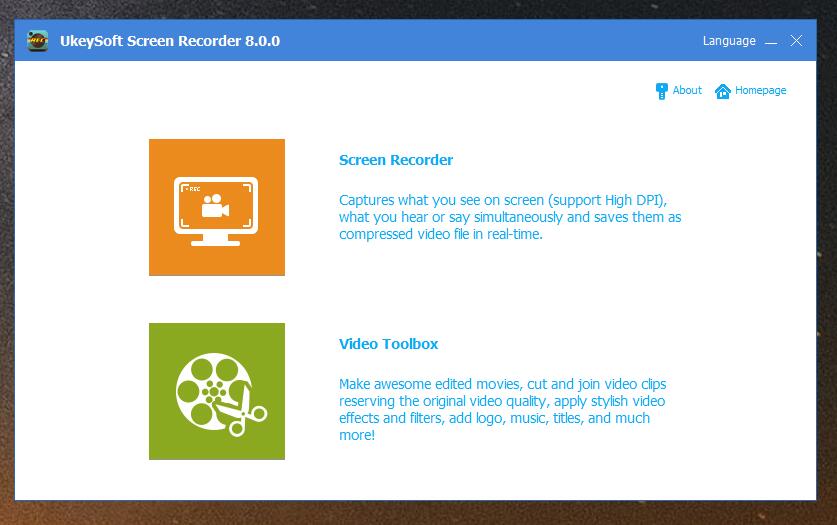
Then launch it, and select "Screen Recorder" function.

You will see its main interface as shown below:

Step 2. Set the Output Format
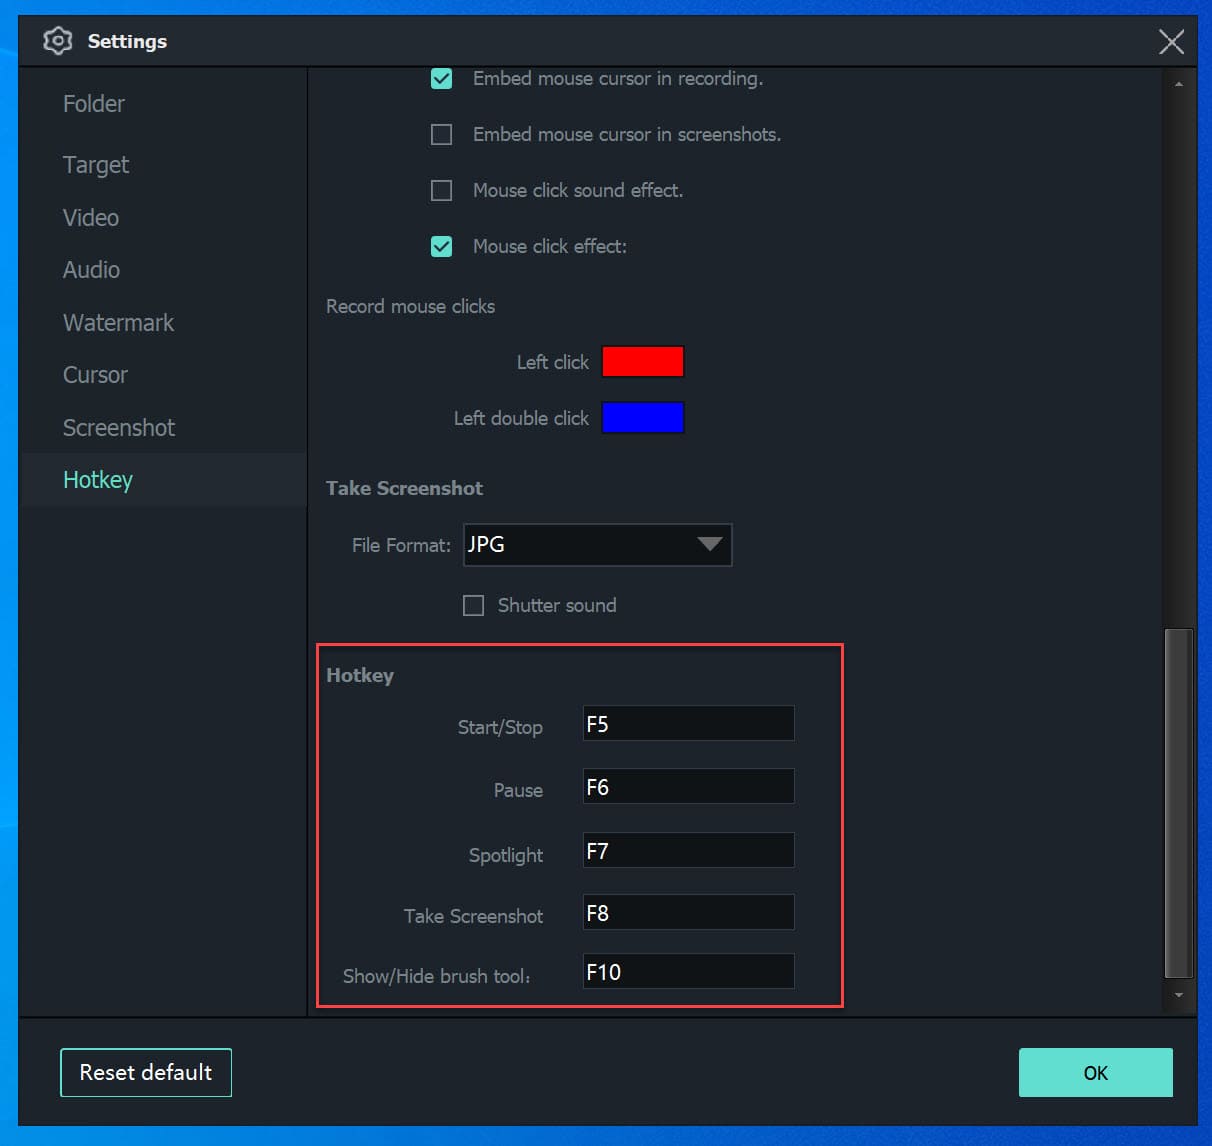
Click "Settings" and the settings window will appear. Tap "Screenshot" in the left side, you can set the output file format.

Hotkey: F8 for screenshots.

Step 3. Take Screenshot on Windows
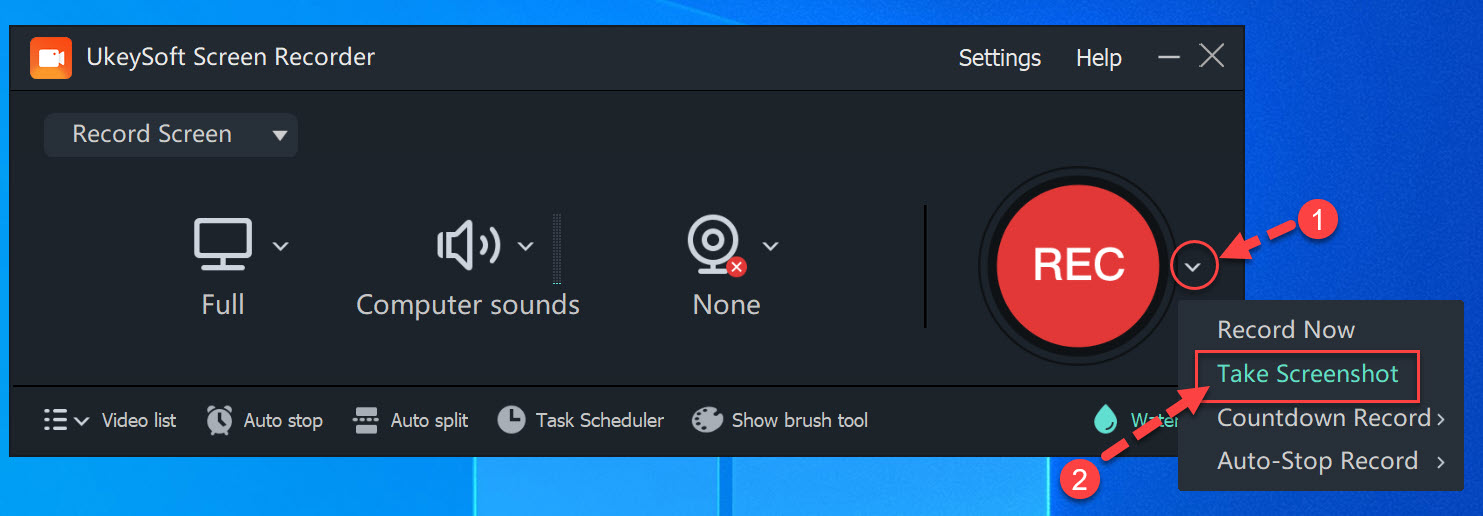
You can now click "Take Screenshot" on its main page, or press F8 on the keyboard to quickly take a screenshot on your Windows.

When the screen is capture, you can click the brush tool in the bottom of the screen, annotate or edit it freely.
Xbox Game Bar not only enables you to screen record your gameplays, but also lets you capture the entire screen or specific regions. If you are having a Windows 10 or Windows 11, you can also use it to take and share game screenshots.
Step 1. Press "Windows key + G" to open the Xbox Game Bar on your Windows 10/11.
Step 2. You can open your gameplay or any video, then click on the Screenshot (a camera icon) on Game Bar.

Step 3. The screenshot will be saved in PNG format. You can visit: This PC > Videos > Captures folder.

Capturing screenshots on a Microsoft Surface device is a straightforward process. Whether you're using a Surface Laptop, Surface Pro, Surface Go, Surface Book, Surface Studio or another model, you can take a screenshot using a combination of hardware buttons. It's as easy as taking a screenshot on your mobile device. Here's how you can do it:
On Surface Pro 4 and later versions: Press the "Power" button and "Volume Up" button simultaneously.

On Surface Duo: Press and hold the "Power" button and "Volume Down" button simultaneously.

On Surface RT, Surface 2, or Surface Pro 3: Press and hold the "Windows" logo and "Volume Down" button at the same time.

When the traditional Print Screen key doesn't exist or doesn't work on your Windows, you can refer to the above six methods to screenshots on Windows. If you want to take screenshots on Windows with advanced features and annotation tools, then UkeySoft Screen Recorder is your best option. You can use it to capture everything on your computer and then annotate, edit it.
Sorry the comment has been closed.

Enjoy safe & freely digital life.
Utility
Multimedia
Copyright © 2024 UkeySoft Software Inc. All rights reserved.
Comments are off!