 ✕
✕
By ChesterUpdated on December 16, 2022
"It's very annoying when encountering errors in iCloud Music Library, how can I disable iCloud Music Library?"
With iCloud Music Library, you can sync all your music across all of your Apple devices if you are subscribed to Apple Music and iTunes Match. However, due to the unstable issues and limitations of iCloud, so people may want to turn off iCloud Music Library to protect their music and have a better listening experience. In the following parts, you will get to understand more about iCloud Music Library and how to turn off it if it's necessary. Most importantly, we have the best way to backup Apple Music without iCloud Music Library.
CONTENTS
What Is The iCloud Music Library?
iCloud Music Library is an amazing service from Apple, If you are subscribed to Apple Music or iTunes Match, you can stream and download tracks to up to 10 devices from iTunes Store, also you can store up 100,000 music files to iCloud. It allows users to access the music library and sync their playlists and songs across all Apple devices that are signed with the same iCloud account.
However, iCould Music Library isn't that perfect and there are still some drawbacks and annoying bugs, we have listed some here.
From all of the drawbacks above it may crash people enthusiasm to use it anymore. So in this case, you may want to turn off iCloud Music Library on your devices. So keep reading the article and we are sharing the guide to help you disable iCloud Music Library on iPhone, Mac, and PC.
What Happens If You Disable iCloud Music Library?
If you decide to disable your iCloud Music Library, you can save yourself from facing syncing issues. However, if you sign out of Apple ID or cancel your Apple Music or iTunes Match subscription, you won't be able to access to your music library on any of your devices. You will be no longer to access your Apple Music, also you will lose the data and other media that you have uploaded on your iCloud, you can't play your Apply Music offline.
But there is another way that you can keep listening to your Apple Music tracks even without using iCloud Music Library, please keep reading the followings.
In this part, we provide the following guides to turn off iCloud Music Library on iPhone, Mac and PC. By the way, if you disable iCloud Music Library on one device, the feature on other devices will not be affected.
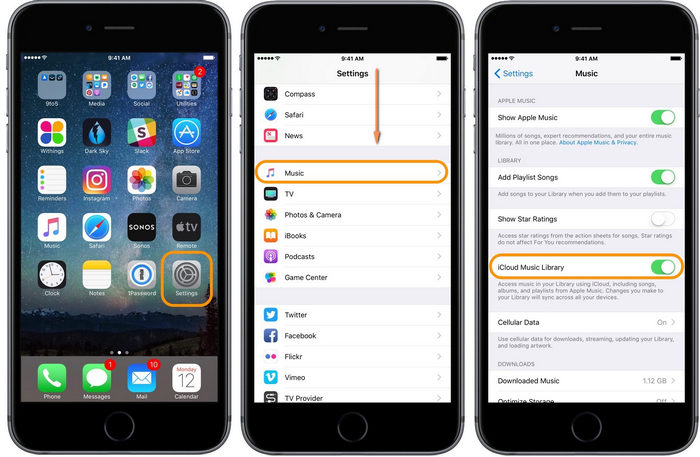
Turn off iCloud Music Library on iPhone
Step 1. Go to Settings on your iPhone.
Step 2. Scroll down until you see Music, then tap in.
Step 3. You will see "iCloud Music Library", just toggle the switch to off.
Turn off iCloud Music Library on Mac/PC
Step 1. Open iTunes on your Mac or PC.
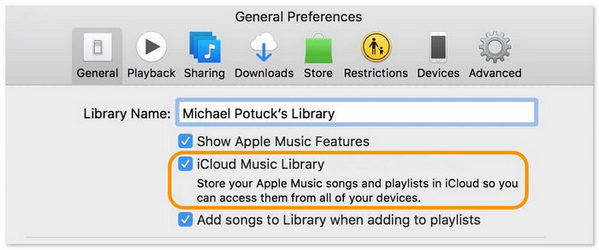
Step 2. On the top bar, go to iTunes > Preferences.
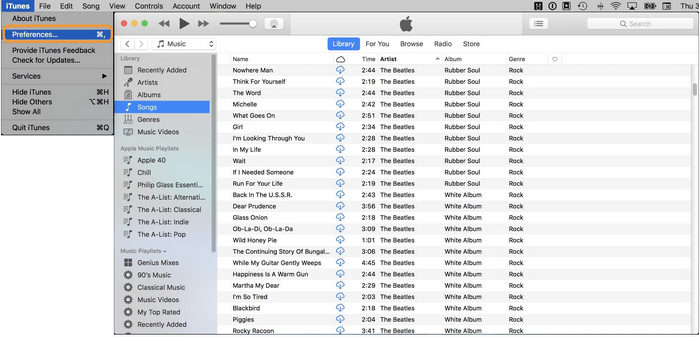
Step 3. Under the General tab, uncheck the iCloud Music Library option.
As we know from above, due the the restrictions of Apple Music, once you turn of iCloud Music Library, all your downloaded Apple Music will be lost, and you will not be able to listening to Apple Music offline anymore. All Apple Music songs are DRM-protected, even you have donwloaded Apple Music, you can not directly copy and transfer the downloaded Apple Music to other devices for personal use. So if you don't like using iCloud Music Library, and you still want to keep Apple Music songs on your devices for offline playing, UkeySoft Apple Music Converter will be your best help to sync/backup Apple Music without iCloud Music Library.
UkeySoft Apple Music Converter is a one-stop professional tool which has ability to get rid off all the restrictions form Apple Muisc, and it is able to download and convert Apple Music to MP3, WAV, M4A, AAC, AU, AIFF and more on your computer. After conversion, you will get the DRM-free Apple Music files in common audio format, and you will be able to play the downloaded Apple Music tracks on other media players or on other diveces offline without turning on iCloud Music Library.
Key Features of UkeySoft Apple Music Converter
One Stop for streaming and converting Apple Music:
No matter you are subscribed to Apple Music or you are a free user, you can download and stream any Apple Music songs, playlists, podcasts with UkeySoft Apple Music Converter.
Remove DRM from Apple Music :
UkeySoft is able to delete DRM from Apple Music songs and playlists, than you can download the DRM-free songs and play them on other unauthorized devices offline without restrictions.
Convert Apple Music to Common Format:
You can convert Apple Music to the most popular audio formats, including MP3, WAV, AAC, M4A, FLAC and more, so that the music files can be played on all devices you like.
Preserve Original Audio Quality and ID3 Tags:
After conversion, you will get Apple Music in 100% lossless audio quality, and all the ID3 tags and metadata information will be kept, which makes people have a good listening experience offline and more convenient for managing the music library.
Fast Conversion Speed :
UkeySoft provides a super fast conversion speed up to 16X in batch, for those who have a massive list of songs, they can be downloaded and converted in a quick time.
Play Apple Music without iCloud Music Library:
You can download and save Apple Music permanently on computer, so you can play Apple Music offline without turning on ICloud Music Library.
Once we are familiar with the amazing features, now it's time to go through the guide on how to use UkeySoft Apple Music Converter to download Apple Music to computer for offline playback.
To download Apple Music to MP3, please follow this guide. Before that, download the latest version of UkeySoft Apple Music Converter and install it to your computer.
Step 1. Run UkeySoft Apple Music Converter and Log In
Once installed, Step 1. Run UkeySoft Program and Log In Account
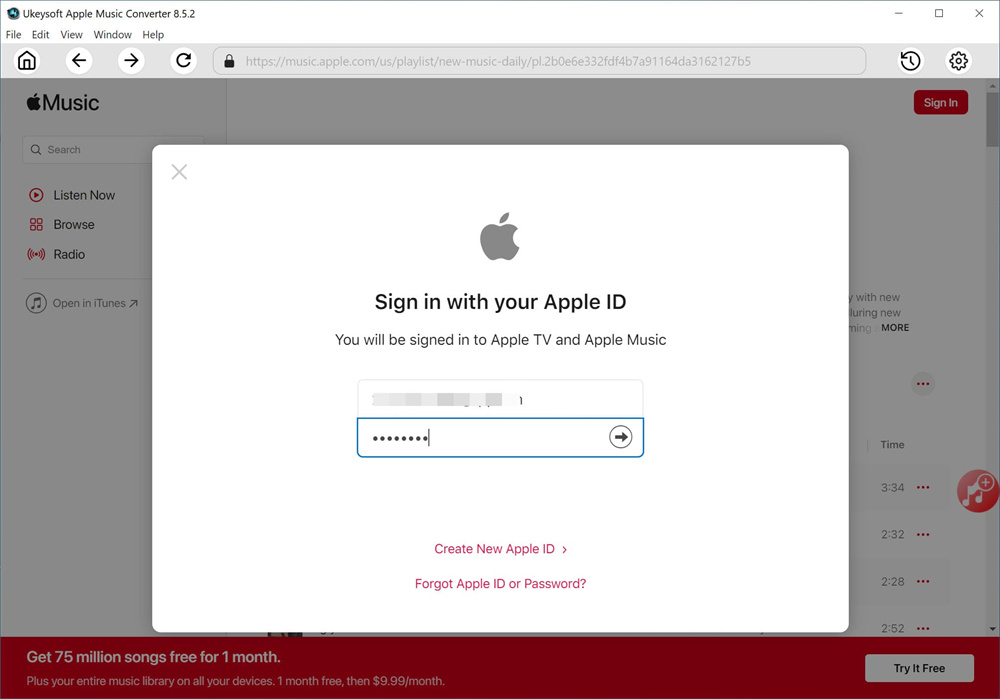
Launch the UkeySoft Apple Music Converter on computer firstly. Click "Sing In" at the upper right corner of the interface to log in your Apple Music account.
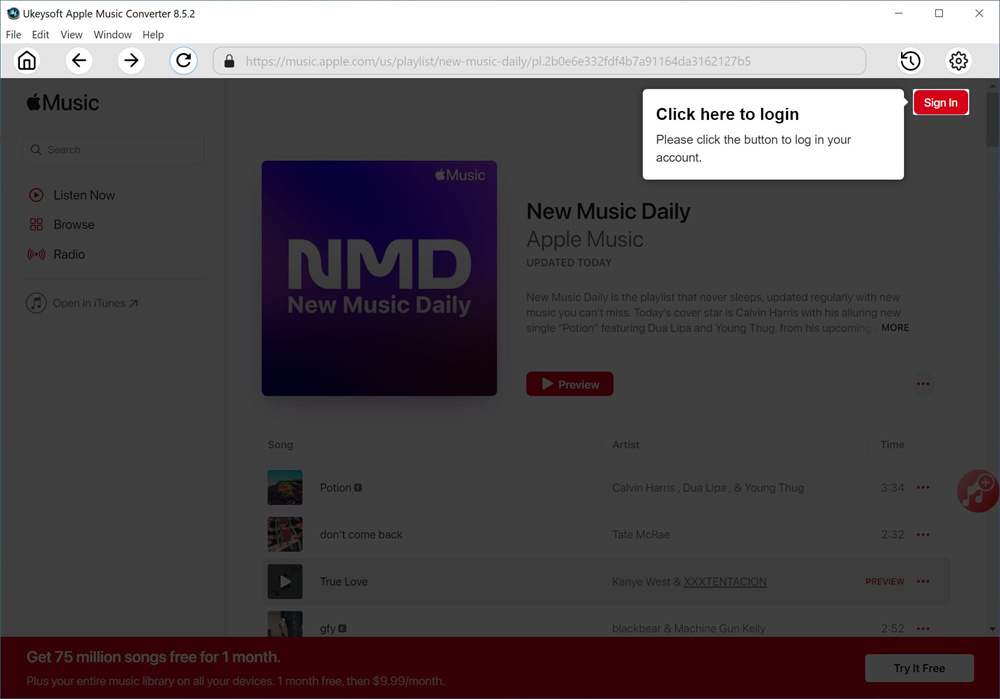
Log in with your Apple ID(with Apple Music subscription).
Step 2. Choose Output Format
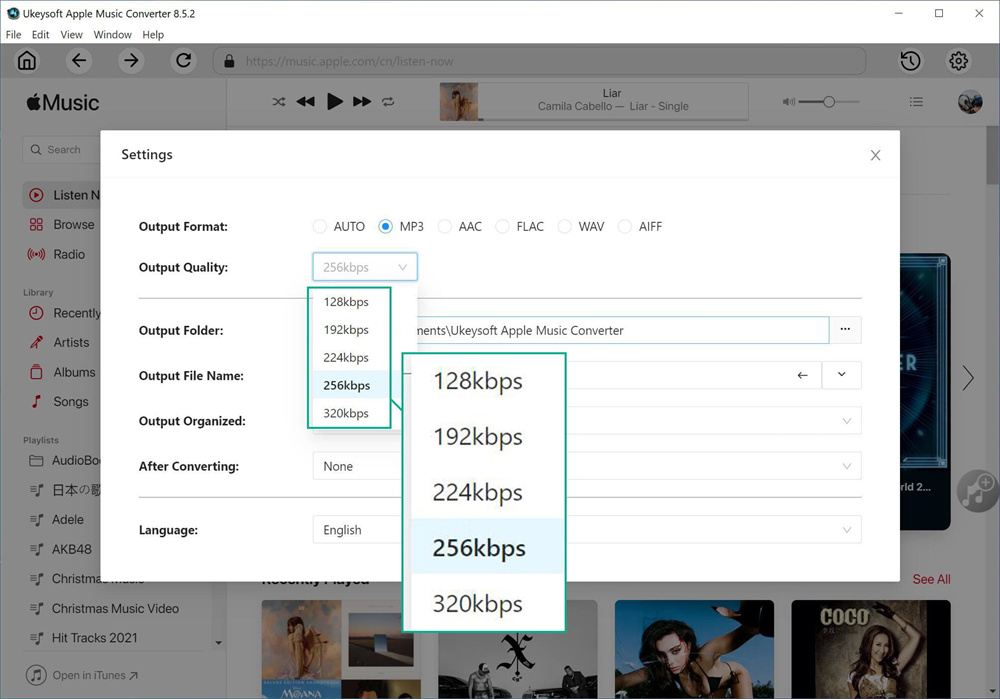
Click the 'Gear' icon on the top right corner to choose output format. The default format is M4A in 256kbps. You can choose MP3, AAC, FLAC, WAV and AIFF and bit rate for the output quality. In here we need to choose MP3. You can also change the output folder and other parameters such as output file name.
Step 3. Add Apple Music to Converting List
Once you have done the output setting, select a playlist, artist or album that you want to dwonload, click the "Add" icon to add songs/playlist to the converting list.
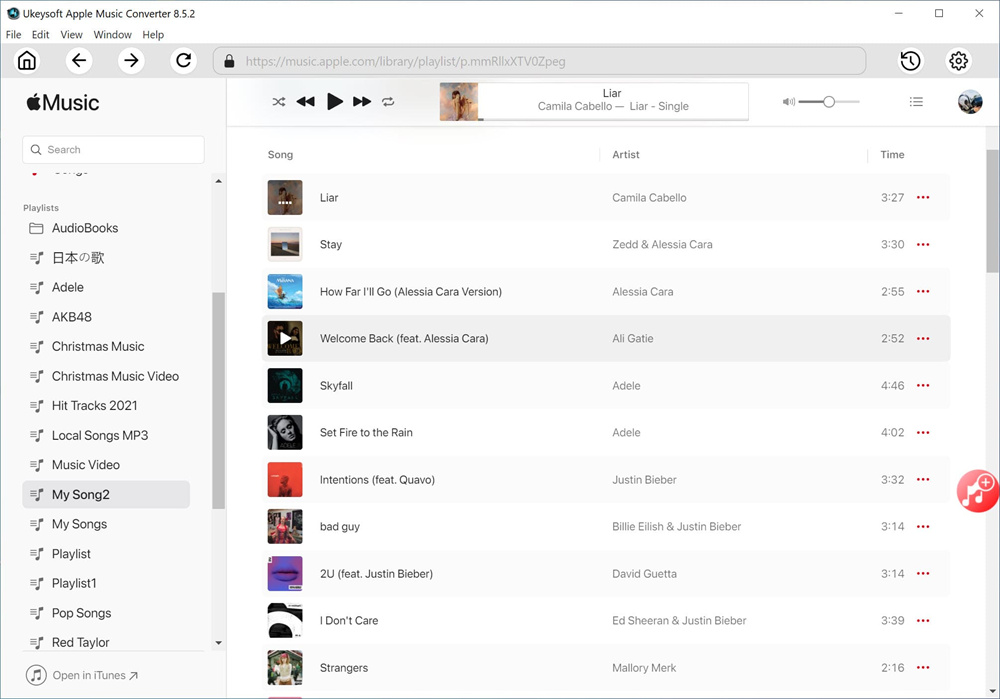
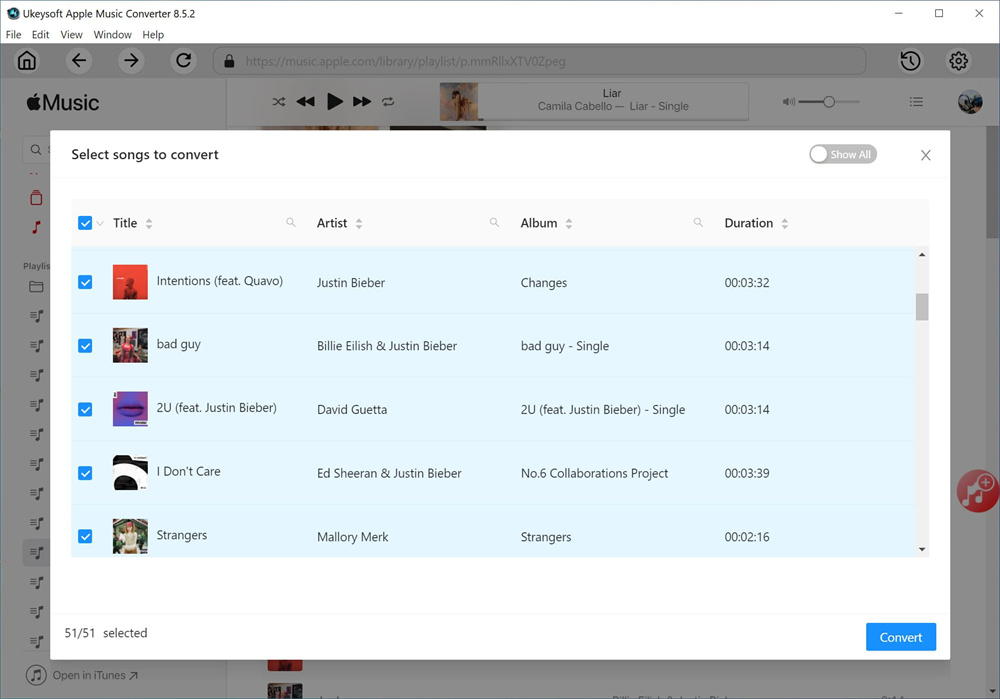
All the songs from the selected playlist will be selccted, you can untick the songs that you do not want from the checkbox.
Step 4. Start to Convert Apple Music to MP3
Now you can click the "Convert" button to convert Apple Music to MP3 audio format. After that, you are able to play Apple Music on any device, and all the output files you get will be retained original quality.
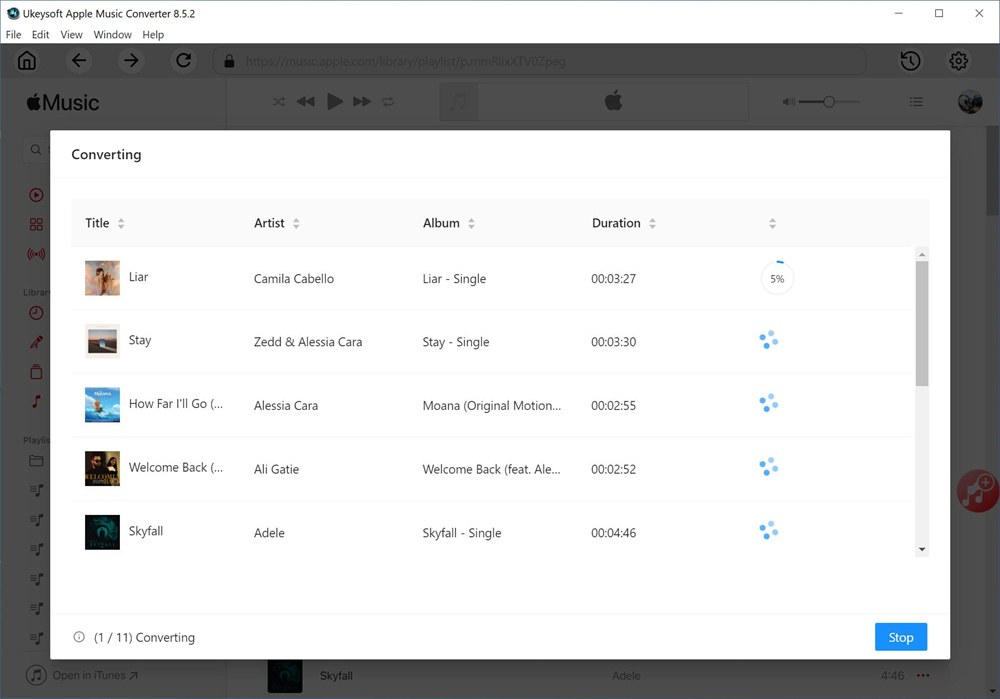
Step 5. Check Converted Apple Music Files
When the conversion is finished, you can click "History" icon to check the converted Apple Music files on your computer. Now you can add Apple Music on other media players and devices for offline playing.
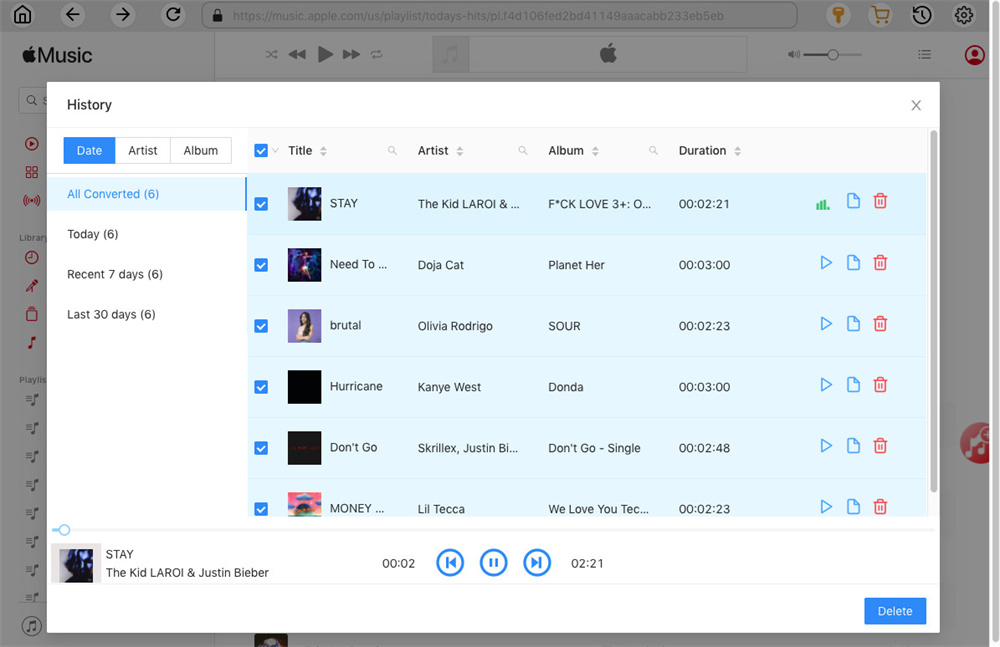
Now you have the converted Apple Music that are saved on your computer, so you can play Apple Music offline without turning on ICloud Music Library.
You have learn the way to turn off iCloud Music Library on iPhone, Mac/PC, before turning off iCloud Music Library, you should know what are the advantages and disadvantages that bring to you. However, to avoid all the annoying bugs and restrictions from iCloud Music Library, you should turn off iCloud Music Library on your devices, then get help from UkeySoft Apple Music Converter. You can easily download and save Apple Music in common audio formats on your computer, so that you can play them on other devices offline without turning on iCloud Music Library.
Prompt: you need to log in before you can comment.
No account yet. Please click here to register.

Convert Apple Music, iTunes M4P Songs, and Audiobook to MP3, M4A, AAC, WAV, FLAC, etc.

Enjoy safe & freely digital life.
Utility
Multimedia
Copyright © 2024 UkeySoft Software Inc. All rights reserved.
No comment yet. Say something...